Jeffrey Wang
文章84
标签144
分类12
ReactJS学习(1) - 安装、JSX、组件、状态和生命周期

ReactJS学习(1) - 安装、JSX、组件、状态和生命周期

ReactJS学习笔记

安装React

安装条件准备

  1. 首先安装node,直接官网上下载安装即可。
  2. 安装完毕后,执行npm install -g create-react-app,全局安装项目构建工具。

创建项目

  1. create-react-app 项目名称,然后进入目录,cd 项目名称,最后npm start,完成项目的启动。

  2. 浏览器中访问localhost:3000即可访问项目。
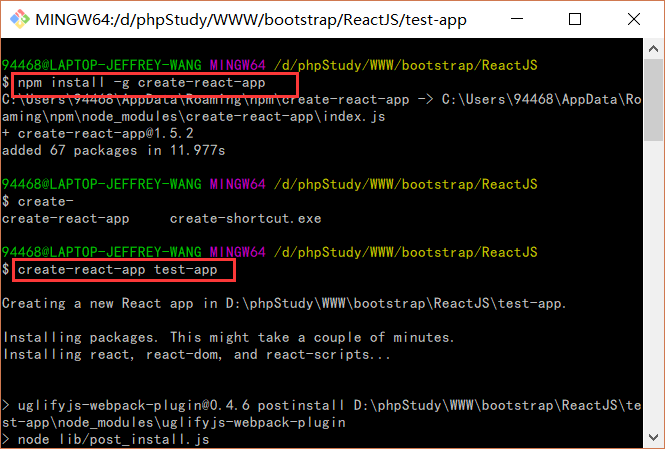
 访问效果:

    学习建议

    开始的时候,可以在在线编辑器上实时调试,会比较方便,使用create-react-app创建的文件全是用类构建,辅以nodeJS得以运行,效率较高。但是对于初学者来说,一层一层的类也容易绕晕,所以比较建议使用ReactDOM采用传统前端架构的形式来学习。 在线编辑器:https://codepen.io 注意:React需要在ReactDOM之前引入。 
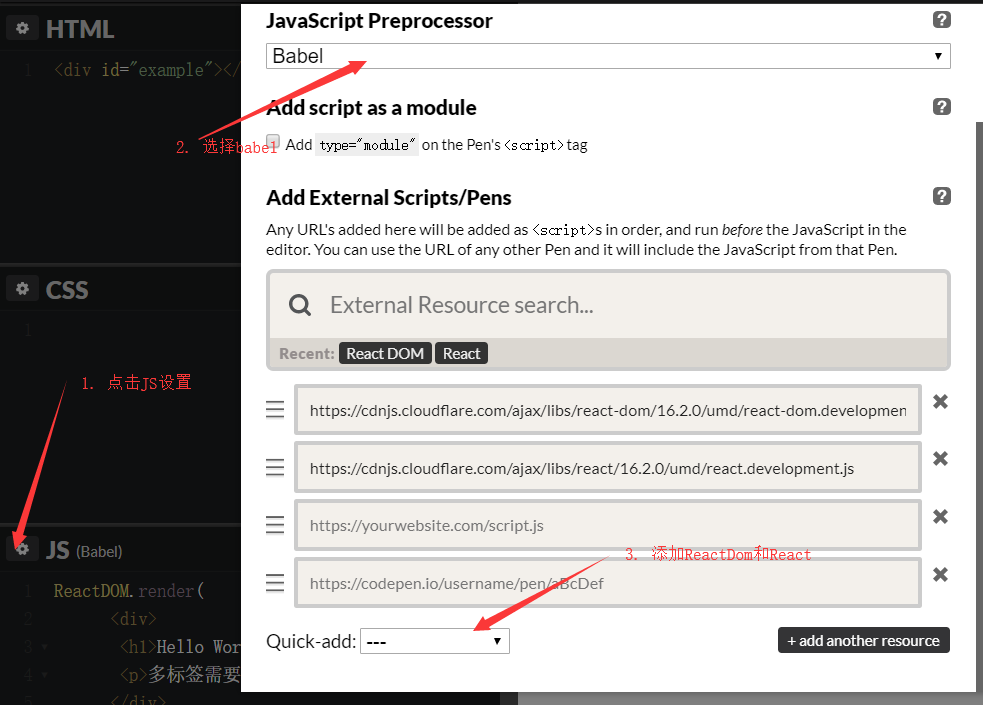
配置编辑器支持React 可以参考如下链接对sublime进行优化以适应react.js的JSX语法: https://segmentfault.com/a/1190000003698071

了解React JSX

优势
1
2
3
1. 执行更快,因为编译过程中做过优化
2. 更加安全,能在编译时发现错误
3. 编辑更简单快速
学习React有啥用

大佬的博客介绍:https://www.cnblogs.com/clearyang/p/6898659.html 当然,吸引我的还有各种高大上的库,比如:阿里的后台模板阿里的前端框架阿里移动端框架高大上的动效库 还有React Native,学会之后可以用React语法做出原生App了,还可以转换成Android和IOS,强大的不要不要的! React Native中文文档

简单渲染

ReactDOM能将渲染虚拟DOM至指定元素,仅需要调用render()函数即可。

1
2
3
4
5
6
7
8
ReactDOM.render(
<div>
<h1>Hello World!</h1>
<p>多标签需要外包div</p>
</div>
,
document.getElementById('example')
);

此段代码可以独立放到js文件中,然后引入即可(type=”text/babel”)。 在线演示:在CodePen中尝试

JavaScript表达式

{name}可以输出变量,并且支持内部表达式。

1
2
3
4
5
6
7
8
9
10
11
var name = 'Wang';
var a = 1;
var b = 2;
ReactDOM.render(
<div>
<p>Hello, {name}!</p>
<p>a + b = {a+b}</p>
<p>结果{(a+b) > 0 ? '大于' : '小于'}零</p>
</div>,
document.getElementById('example')
);

:JSX不支持if…else…,但是可以使用三目表达式来处理条件判断。 在线演示:在CodePen中尝试

设置样式和注释

JSX支持使用 camelCase 语法来设置内联样式 ,如:

1
2
3
4
5
6
7
8
9
10
11
var btnStyle = {
fontSize: '20px',
color: '#fff',
};
ReactDOM.render(
<div>
{/*这里是注释哦!!!*/}
<button style={btnStyle}>这是按钮</button>
</div>,
document.getElementById('example')
);

在线演示:https://codepen.io/wangerzi/pen/MGGPEb

展开数组

JSX自动展开数组元素

1
2
3
4
5
6
7
8
9
10
11
12
13
var viceTitleStyle = {
textAlign: 'right',
};
var arr = [
<h1>这里是ReactJS学习实况</h1>,
<h2 style={viceTitleStyle}>-- Jeffrey Wang</h2>
];
ReactDOM.render(
<div>
{arr}
</div>,
document.getElementById('example')
);

在线演示:https://codepen.io/wangerzi/pen/OZZBxe

重新渲染

仅需要重新调用render()即可,并且React只更新需要更新的地方。

1
2
3
4
5
6
7
8
9
function runtime(){
ReactDOM.render(
<div>
<h2>{new Date().toLocaleTimeString()}</h2>
</div>,
document.getElementById('example')
);
}
setInterval(runtime, 1000);

在线演示:https://codepen.io/wangerzi/pen/LmmgOm

React组件

html标签和React组件渲染的区别

渲染html标签的时候,标签都是以小写字母开头,如:<div></div>等。 渲染自定义组件时,标签都是以大写字母开头,如:<MyComponent></MyComponent>等。 :由于JSX也是JS,所以class,for等属性不宜直接书写,应写为className,htmlFor

创建组件并渲染

创建一个函数MyComponent,接受一个参数props,props参数传递DOM的属性值。

1
2
3
4
5
6
7
function MyComponent(props){
return <h1>Hello {props.name}!</h1>;
}
ReactDOM.render(
<MyComponent name="Wang" />,
document.getElementById('example')
);

在线演示:https://codepen.io/wangerzi/pen/errPyv

复合组件(Composing Components)

新建组件的时候,可以自由组合其他组件,但是注意,复合的组件顶层也应该只有一个标签。

1
2
3
4
5
6
7
8
9
10
11
12
13
14
15
16
function MyName(props){
return <h2>Hello, My name is {props.data}</h2>;
}
function MyAge(props){
return <h2>My Age is {props.data}</h2>;
}
function MyInfo(props){
return <div>
<MyName data={props.name} />
<MyAge data={props.age} />
</div>;
}
ReactDOM.render(
<MyInfo name="Wang" age="21" />,
document.getElementById('example')
);

注意:通过props给子组件传递参数时,不可加引号。 在线演示:https://codepen.io/wangerzi/pen/deegJj

拆分组件

一些嵌套比较深的组件,可以拆分为多个组件,独立出来以减少耦合。

1
2
3
4
5
6
7
8
9
10
11
12
13
14
15
16
17
18
19
20
21
22
23
24
25
26
27
28
29
// 杂糅在一起的示范
function MyComment(props){
return <div>
<div className="comment-head">
<div className="user-info">
<img src={props.author.avatar} />
<span>{props.author.name}</span>
</div>
</div>
<div className="comment-body">
<div className="comment-content">{props.comment.content}</div>
<div className="comment-time">{props.comment.time.toString()}</div>
</div>
</div>
}
const data = {
author: {
avatar: 'http://placekitten.com/g/64/64',
name: 'JeffreyWang',
},
comment: {
time: new Date(),
content: '这里是评论内容!',
}
};
ReactDOM.render(
<MyComment author={data.author} comment={data.comment} />,
document.getElementById('example')
);

在线演示:https://codepen.io/wangerzi/pen/OZZBze

1
2
3
4
5
6
7
8
9
10
11
12
13
14
15
16
17
18
19
20
21
22
23
24
25
26
27
28
29
30
31
32
33
34
35
// 拆分为多个组件,便于多次使用。
function UserInfo(props){
return <div className="user-info">
<img src={props.data.avatar} />
<span>{props.data.name}</span>
</div>
}
function CommentInfo(props){
return <div className="comment-body">
<div className="comment-content">{props.data.content}</div>
<div className="comment-time">{props.data.time.toString()}</div>
</div>
}
function MyComment(props){
return <div>
<div class="comment-head">
<UserInfo data={props.author} />
</div>
<CommentInfo data={props.comment} />
</div>
}
const data = {
author: {
avatar: 'http://placekitten.com/g/64/64',
name: 'JeffreyWang',
},
comment: {
time: new Date(),
content: '这里是评论内容!',
}
};
ReactDOM.render(
<MyComment author={data.author} comment={data.comment} />,
document.getElementById('example')
);

在线演示:https://codepen.io/wangerzi/pen/LmmgQr 注意:无论是通过function直接创建组件,或者通过新增类来创建组件,处理方法都需要是纯函数,即:不得改变传递参数props的值。如果需要使用可变的变量,可以参考下一节的状态和生命周期。

状态和生命周期

之前构建自定义组件的时候,都是以函数式构建的,但是现在需要以类来构建,以支持状态。

组件状态

注意:新老版本创建类的代码不一样,请注意区别。

1
2
3
4
5
6
7
8
9
10
11
12
13
14
15
16
17
18
19
20
21
22
23
24
25
26
27
28
29
30
31
// 新版本 - 使用ES6的继承
class MyInfo extends React.Component{
// 初始化状态
constructor(props){
super(props);
this.state = {date: new Date()};
}
render(){
return <h1>Hello {this.props.name} {this.state.date.toString()}</h1>;
}
}
// 新版本 - 易于理解的写法
class MyInfo extends React.Component{
render = function(){
return <h1>Hello {this.props.name} {this.state.date.toString()}</h1>;
}
}
ReactDOM.render(
<MyInfo name="JeffreyWang" />,
document.getElementById('example')
);
// 老版本- 使用React.createClass
var MyInfo2 = React.createClass({
render: function(){
return <h1>Hello {this.props.name}</h1>;
}
});
ReactDOM.render(
<MyInfo2 name="JeffreyWang" />,
document.getElementById('example')
);

在线演示:https://codepen.io/wangerzi/pen/MGGzwO 老版本表现方法:https://www.cnblogs.com/javascript-center/p/5533131.html 注意:内部this.state = {data: new Date()};即为状态,完全由组件自己管理,可以随意组件的意愿改变。 constructor(){}为构造函数,可用于初始化组件状态。

生命周期

在一个具有许多组件的应用程序中,在组件被销毁时释放所占用的资源是非常重要的。 组件渲染时,有一些特殊的回调,我们称为钩子函数,如:有一个componmentDidMount钩子函数,会在首次加载到DOM的时候会执行函数内容,再比如componmentWillUnmount钩子函数,会在卸载DOM的时候执行函数内容。 注意:this.setState(obj);会触发DOM的重新渲染,直接this.state.xxx = xxx;是不触发渲染的。

1
2
3
4
5
6
7
8
9
10
11
12
13
14
15
16
17
18
19
20
21
22
23
24
25
26
class Clock extends React.Component{
constructor(props){
super(props);
this.state = {date:new Date()};
}
componentDidMount(){
// 这里由于timeIndex并不需要显示,所以并没有存放到this.state中。
// 这里的() => {}是一个ES6中的箭头函数,考虑到constructor()函数已经是ES6的语法了,所以这里直接用的() => {}。
this.timeIndex = setInterval(() => {
this.setState({date: new Date()});
}, 1000);
}
componentWillUnmount(){
if(this.timeIndex){
clearInterval(this.timeIndex);
}
this.timeIndex = 0;
}
render(){
return <h1>当前时间:{this.state.date.toLocaleTimeString()}</h1>
}
}
ReactDOM.render(
<Clock />,
document.getElementById('example')
);

引用官网文档:

来快速回顾一下该过程,以及调用方法的顺序:

  1. <Clock /> 被传入 ReactDOM.render() 时, React 会调用 Clock组件的构造函数。 因为 Clock 要显示的是当前时间,所以它将使用包含当前时间的对象来初始化 this.state 。我们稍后会更新此状态。
  2. 然后 React 调用了 Clock 组件的 render() 方法。 React 从该方法返回内容中得到要显示在屏幕上的内容。然后,React 然后更新 DOM 以匹配 Clock 的渲染输出。
  3. Clock 输出被插入到 DOM 中时,React 调用 componentDidMount() 生命周期钩子。在该方法中,Clock 组件请求浏览器设置一个定时器来调用匿名方法更新this.state.date
  4. 浏览器会每隔一秒调用一次 匿名方法。在该方法中, Clock 组件通过 setState() 方法并传递一个包含当前时间的对象来安排一个 UI 的更新。通过 setState(), React 得知了组件 state(状态)的变化, 随即再次调用 render() 方法,获取了当前应该显示的内容。 这次,render() 方法中的 this.state.date 的值已经发生了改变, 从而,其输出的内容也随之改变。React 于是据此对 DOM 进行更新。
  5. 如果通过其他操作将 Clock 组件从 DOM 中移除了, React 会调用 componentWillUnmount()生命周期钩子, 所以计时器也会被停止。
使用状态(state)的三个要点
  1. 不能直接在钩子函数里边修改this.state,因为这并不会令DOM更新,只有在constructor()内直接修改this.state才是有效的,应该使用this.setState({name: value})

    1
    2
    3
    4
    // 错误的示范
    this.state.date = new Date();
    // 正确的示范
    this.setState({date: new Date()});
  2. state的更新可能是异步的,因为出于性能优化的考虑,可能会将多个setState合并为一个进行更新。所以说,不能直接依赖this.props或者this.state

    1
    2
    3
    4
    5
    6
    // 错误的示范
    this.setState({count : this.state.count + 1)。
    // 正确的示范
    this.setState(function(prevState, props){
    return {count: prevState.count + 1};
    });

    在线演示:https://codepen.io/wangerzi/pen/ELLMRr

  3. state的更新会被合并,每次更新不同的项目并不会互相影响,比如:

    1
    2
    3
    4
    5
    6
    7
    8
    9
    10
    11
    12
    13
    14
    15
    16
    17
    18
    19
    20
    21
    22
    23
    24
    25
    class CommentBox extends React.Component{
    constructor(props){
    super(props);
    this.state = {
    users: [],
    comments: [],
    }
    }
    componentDidMount(){
    this.setState({users: ['user1', 'user2']});
    this.setState({comments: ['1111', '233333']});
    }
    render(){
    return <div>
    users:
    {this.state.users}
    comments:
    {this.state.comments}
    </div>;
    }
    }
    ReactDOM.render(
    <CommentBox />,
    document.getElementById('example')
    );

    在线演示:https://codepen.io/wangerzi/pen/LmmaaY

  4. state可以通过属性的形式向下传递,比如子组件<Clock name={this.state.name}>,子组件并不在意上层组件传递的数据是 state、prop或者手动写入,也不论上层组件是函数式抑或类,都使用this.props.xxx来进行参数接受。

    1
    2
    3
    4
    5
    6
    7
    8
    9
    10
    11
    12
    13
    14
    15
    16
    17
    18
    19
    20
    21
    22
    23
    24
    25
    function MyName(props){
    return <h2>Hello, My name is {props.data}</h2>;
    }
    function MyAge(props){
    return <h2>My Age is {props.data}</h2>;
    }
    class MyInfo extends React.Component{
    constructor(props){
    super(props);
    this.state = {
    name: props.name 'Wang',
    age: props.age 21,
    }
    }
    render(){
    return <div>
    <MyName data={this.state.name} />
    <MyAge data={this.state.age} />
    </div>;
    }
    }
    ReactDOM.render(
    <MyInfo name="Wang" />,
    document.getElementById('example')
    );

    在线演示:https://codepen.io/wangerzi/pen/vjjPqK

本文作者:Jeffrey Wang
本文链接:https://blog.wj2015.com/2018/05/12/reactjs%E5%AD%A6%E4%B9%A01-%E5%AE%89%E8%A3%85%E3%80%81jsx%E3%80%81%E7%BB%84%E4%BB%B6%E3%80%81%E7%8A%B6%E6%80%81%E5%92%8C%E7%94%9F%E5%91%BD%E5%91%A8%E6%9C%9F/
版权声明:本文采用 CC BY-NC-SA 3.0 CN 协议进行许可
×